Rotating Barrel Composter
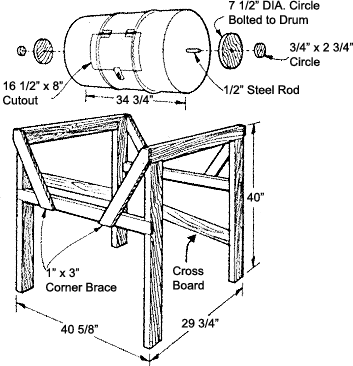
If your composting operation is small and you neither relish nor have the time for turning garbage, then you'll find this composter suited to your needs. The barrel is rotated several times whenever new materials are added. It is constructed with a minimum of hand-powered tools, and is not difficult or time-consuming to build. It will cost about $60 to build providing you use second-hand materials.

MATERIALS
1 - 45-gallon drum, use 'food grade' drum only (composter)
4 - 40 x 2 x 4" (frame uprights)
2 - 29 3/4 x 2 x 4" (frame horizontals)
2 - 40 5/8 x 1 x 3" (cross braces) white pine
4 - 23 3/4 x 1 x 3" (corner braces) white pine
2 - 27 x 2 x 4" (cross boards) white pine
2 - 7 1/2" dia. x 3/4" (bearings) white pine or plywood
2 - 2 3/4" dia. x 3/4" (bearings) white pine or plywood
2 - 1 1/2 x 2" hinges
1 - small hasp
1 - 1/2 x 40 1/2" steel rod
8 - 1/4 x 1 1/4" stove bolts
12 - 1/4 x 1" stove bolts
28 - 1 1/2" #10 wood screws
wood glue
approximately 1 pint of flat black paint
CONSTRUCTION
- Obtain a good 45-gallon drum that has not had any toxic chemicals in it. Ask for a 'food grade' barrel. It must be unpainted on the inside and de-rusted. Add a protective coating inside. A plastic drum can also be used.
- Drill a 1/2" hole in the exact center of both ends of the barrel to accommodate the 1/2" steel rod. (See illustration for how to make a simple tool to locate centers.) Hold the rounded end of the gauge anywhere along the circumference and scribe a line on the approximate center. Move the gauge 90 degrees and scribe another line. The intersection of these lines will be the exact center.
- Next scribe the lines for the opening in the barrel making sure to round the corners slightly. Drill a 1/4" hole somewhere along one of the lines to start the saber saw. If your barrel has ribs, as most do, you will have to cut a 1" vee notch on each rib to facilitate opening the door. Attach the hinges and the hasp to the barrel and lid using 1 x 1/4" stove bolts.
- From 3/4" white pine, cut two circles 7 1/2" in diameter and two circles 2 3/4" in diameter. Drill a 1/2" hole in the center of each and apply glue to the 2 3/4" circles. Glue the 2 3/4" circles to the 7 1/2" circles. This can be done easily if the circles are temporarily slipped over the 1/2" steel rod and clamped. After the glue has dried, remove the disks, insert the rod through the barrel and assemble as shown in the illustration, using four 1 1/4 x 1/4" stove bolts in each.
- To build the support frame, cut the 2-by-4's to length and, using a corner lap joint, assemble with two 1 1/2" #10 wood screws in each joint. The uprights will also have to be dadoed 23 inches from the bottom to accept a 1 x 3" board. To make a corner lap joint, simply remove one-half the thickness of the stock to a length comparable to the width of the stock, on both ends of all pieces.
- Half-inch holes to accommodate the rod will have to be drilled in the exact center of the top horizontal pieces before assembling the top portion of the support frame. Slip the 1/2" steel rod with barrel attached, through these holes and insert the cross members into the dadoed uprights. Fasten with 1 1/2" #10 wood screws. Next cut the 1 x 3 x 23 1/4" piece at 45-degree angles at both ends, and attach with 1 1/2" #10 wood screws across corners as shown in the illustration.
- For extra support, use 2 x 4 x 27" cross boards on each side. Cut them to an angle as the upper end is at 14 1/2" and lower end at 29" from the top of the 2 x 4 frame horizontals.
- Drill several rows of 1/4" holes along the bottom of the barrel exactly underneath the door opening to eliminate excess moisture. Paint the outside of the unit a flat black color.
(This design information was taken from the book The Rodale Guide to Composting, by Jerry Minnich, Marjorie Hunt, and the Editors of Organic Gardening Magazine, Rodale Press, Emmaus, PA)